

Make Stunning Quilted Soft-sculpture Crows with Fabric and Stitching
Let’s make some Crows with fabric and simple tools and materials!
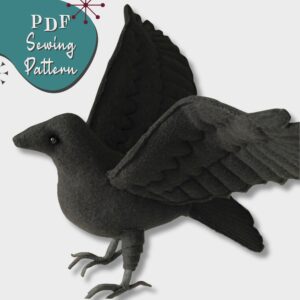
These soft-sculpture Crows have quilting on wings and tail to give the look of feathers. They are much easier to make than they look, and the Pattern and Instructions are written for any level of sewist.
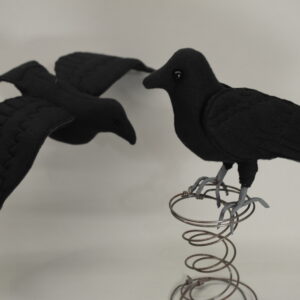
You can find both a PDF sewing pattern and in-the-hoop designs for embroidery machines here at Ballyhoo Creations. The sewing pattern makes a 13″ Crow, while the Embroidery Machine designs make a 10″ and 15″ version. You may resize however you like. And each pattern includes both a Standing and Flying Version of the Crow cloth figures.

The free video is provided in ADDITION to the Photo Instructions in your download. Plus the PDF Instructions can be zoomed in when viewed on a computer or tablet so you can see all the details in the photos.
Video Tutorial Chapters
- 00:00 Intro
- 00:43 Stitching with Embroidery Machine
- 02:39 Stitching with Sewing Machine
- 04:26 Cut and Turn
- 06:10 Wired Bird Legs
- 07:44 Stuffing and Tail
- 08:22 Attach Wings
- 09:41 Eyes and Thighs
Tools & Materials:
More details can be found in your Instructions document. Some of these links may be affiliate links where I will earn a small bounty if you purchase after clicking. This does NOT affect the price you pay. 🙂
Tools
- Embroidery Machine or Sewing Machine
- Sharp Scissors
- Hemostats or other tool for turning
- Long doll needles and strong thread
- Pins or clips for holding fabric
- Fabric marking pen or chalk
- Tape measure or ruler
- (optional) fabric glue
- (optional) needle nose pliers with wirecutter
- Crow Sewing or ITH Pattern (below)
Materials
- Black fabric – fleece preferred but anything can work
- • Lightweight tear-away stabilizer, (Sulky® Tear-Easy™ works well)
- Wing and tail stiffener such as • Annie’s™ Soft & Stable™ foam interfacing or light quilt batting
- Sewing Thread for top and bobbin
- Fiber fill
- Glass beads for eyes
- 1/16″ thin armature wire
- (optional) floral tape, electrical tape, and paint for feet


 Subscribe to my channel


