


Santa’s Coat and Hat
$5.00
Stitch a cute and tiny Santa coat and hat in the hoop of your embroidery machine, then embellish with fur trim, ribbon, pom-poms, bells, or whatever trims you have on hand! Stitches up fast, and makes a great stash-buster project.
Lots more details down below including suggested materials and instructions.
There are so many ideas on what you can do with these tiny coat and hat sets:
- Stitch up several and use mini-clothespins to hang them on a “clothesline” as holiday decor.
- Turn them into ornaments or package tags.
- Create a new holiday tradition. Leave a tiny coat and hat with Santa’s Christmas Eve snacks. In case Santa gets dirty on his journeys – he’ll have clean spares provided by your family. (Santa can “embiggen” them with his magic, of course.)
- These will fit the Ballyhoo cloth character dolls made in 5×7 or 6×10 hoops.
All the stitching is done in the hoop of your embroidery machine on non-fray fabrics. Then cut out, turn and embellish with your choice of trims.
All designs are digital downloads and require an embroidery machine to make these projects. We don’t ship anything from Ballyhoo Creations.
- Files will be available immediately after purchase on a download page.
- Check the Specs tab for included files, sizes, and # stitches
- Fits these machine embroidery hoop sizes: 4×4, 5×7, 6×10
- Finished size of this project: see photo for three different sizes
- Skill level: beginner machine embroidery, novice on turning small parts inside out (much easier with hemostats!!)
Be sure to check the tabs above for more info like Instructions, Supplies, and Specs!
Supplies Needed
These are the recommended tools and materials for this machine embroidery project
Tools
- embroidery machine with files loaded
- sharp fabric scissors
- small embroidery scissors
- hemostats for turning small clothes
- machine needle for your fabric (size 11 embroidery needle should work for stretch knit, a size 14 may be needed for thick fleece)
Materials
- Non-fray fabrics recommended for coat and hat. (t-shirt knit, felt, fleece, or similar) Shown in the photos is Luxe Fleece from JoAnne in Rubarb.
- Tear-away stabilizer
- embroidery thread & bobbin thread
- (optional) embellishments of choice. Shown in photos is fur yarn Go For Faux fur yarn from JoAnne in Chinchilla color.
- fabric glue or hand needle and thread for embellishments. (Fabri-fix glue is used for the sample to stick to the fur and fleece.)
Instructions
Written instructions along with design templates are included in your download so you can print them out.
The instructions are also available right here so you can view them on your phone, tablet, or computer while you’re working at your embroidery machine. How cool is that?
INSTRUCTIONS for hat & coat in 5×7 or 6×10 hoops:
1. Hoop tear-away stabilizer in your machine embroidery hoop
2. STITCH COLOR 1 onto the stabilizer. This will make a placement outline showing you where to place your fabrics for hat and coat all in one hooping.
3. The hat will be stitched first. Place a folded piece of non-fray fabric so that both layers cover the hat outline on the stablizer and the fabric fold is on the line marked “fold.” (Use the included template to help cut the right sizes of rectangles)
4. STITCH COLOR 2 to stitch the hat seam. Then the needle will advance to the coat area to make a few anchoring stitches before stopping for fabric placement.
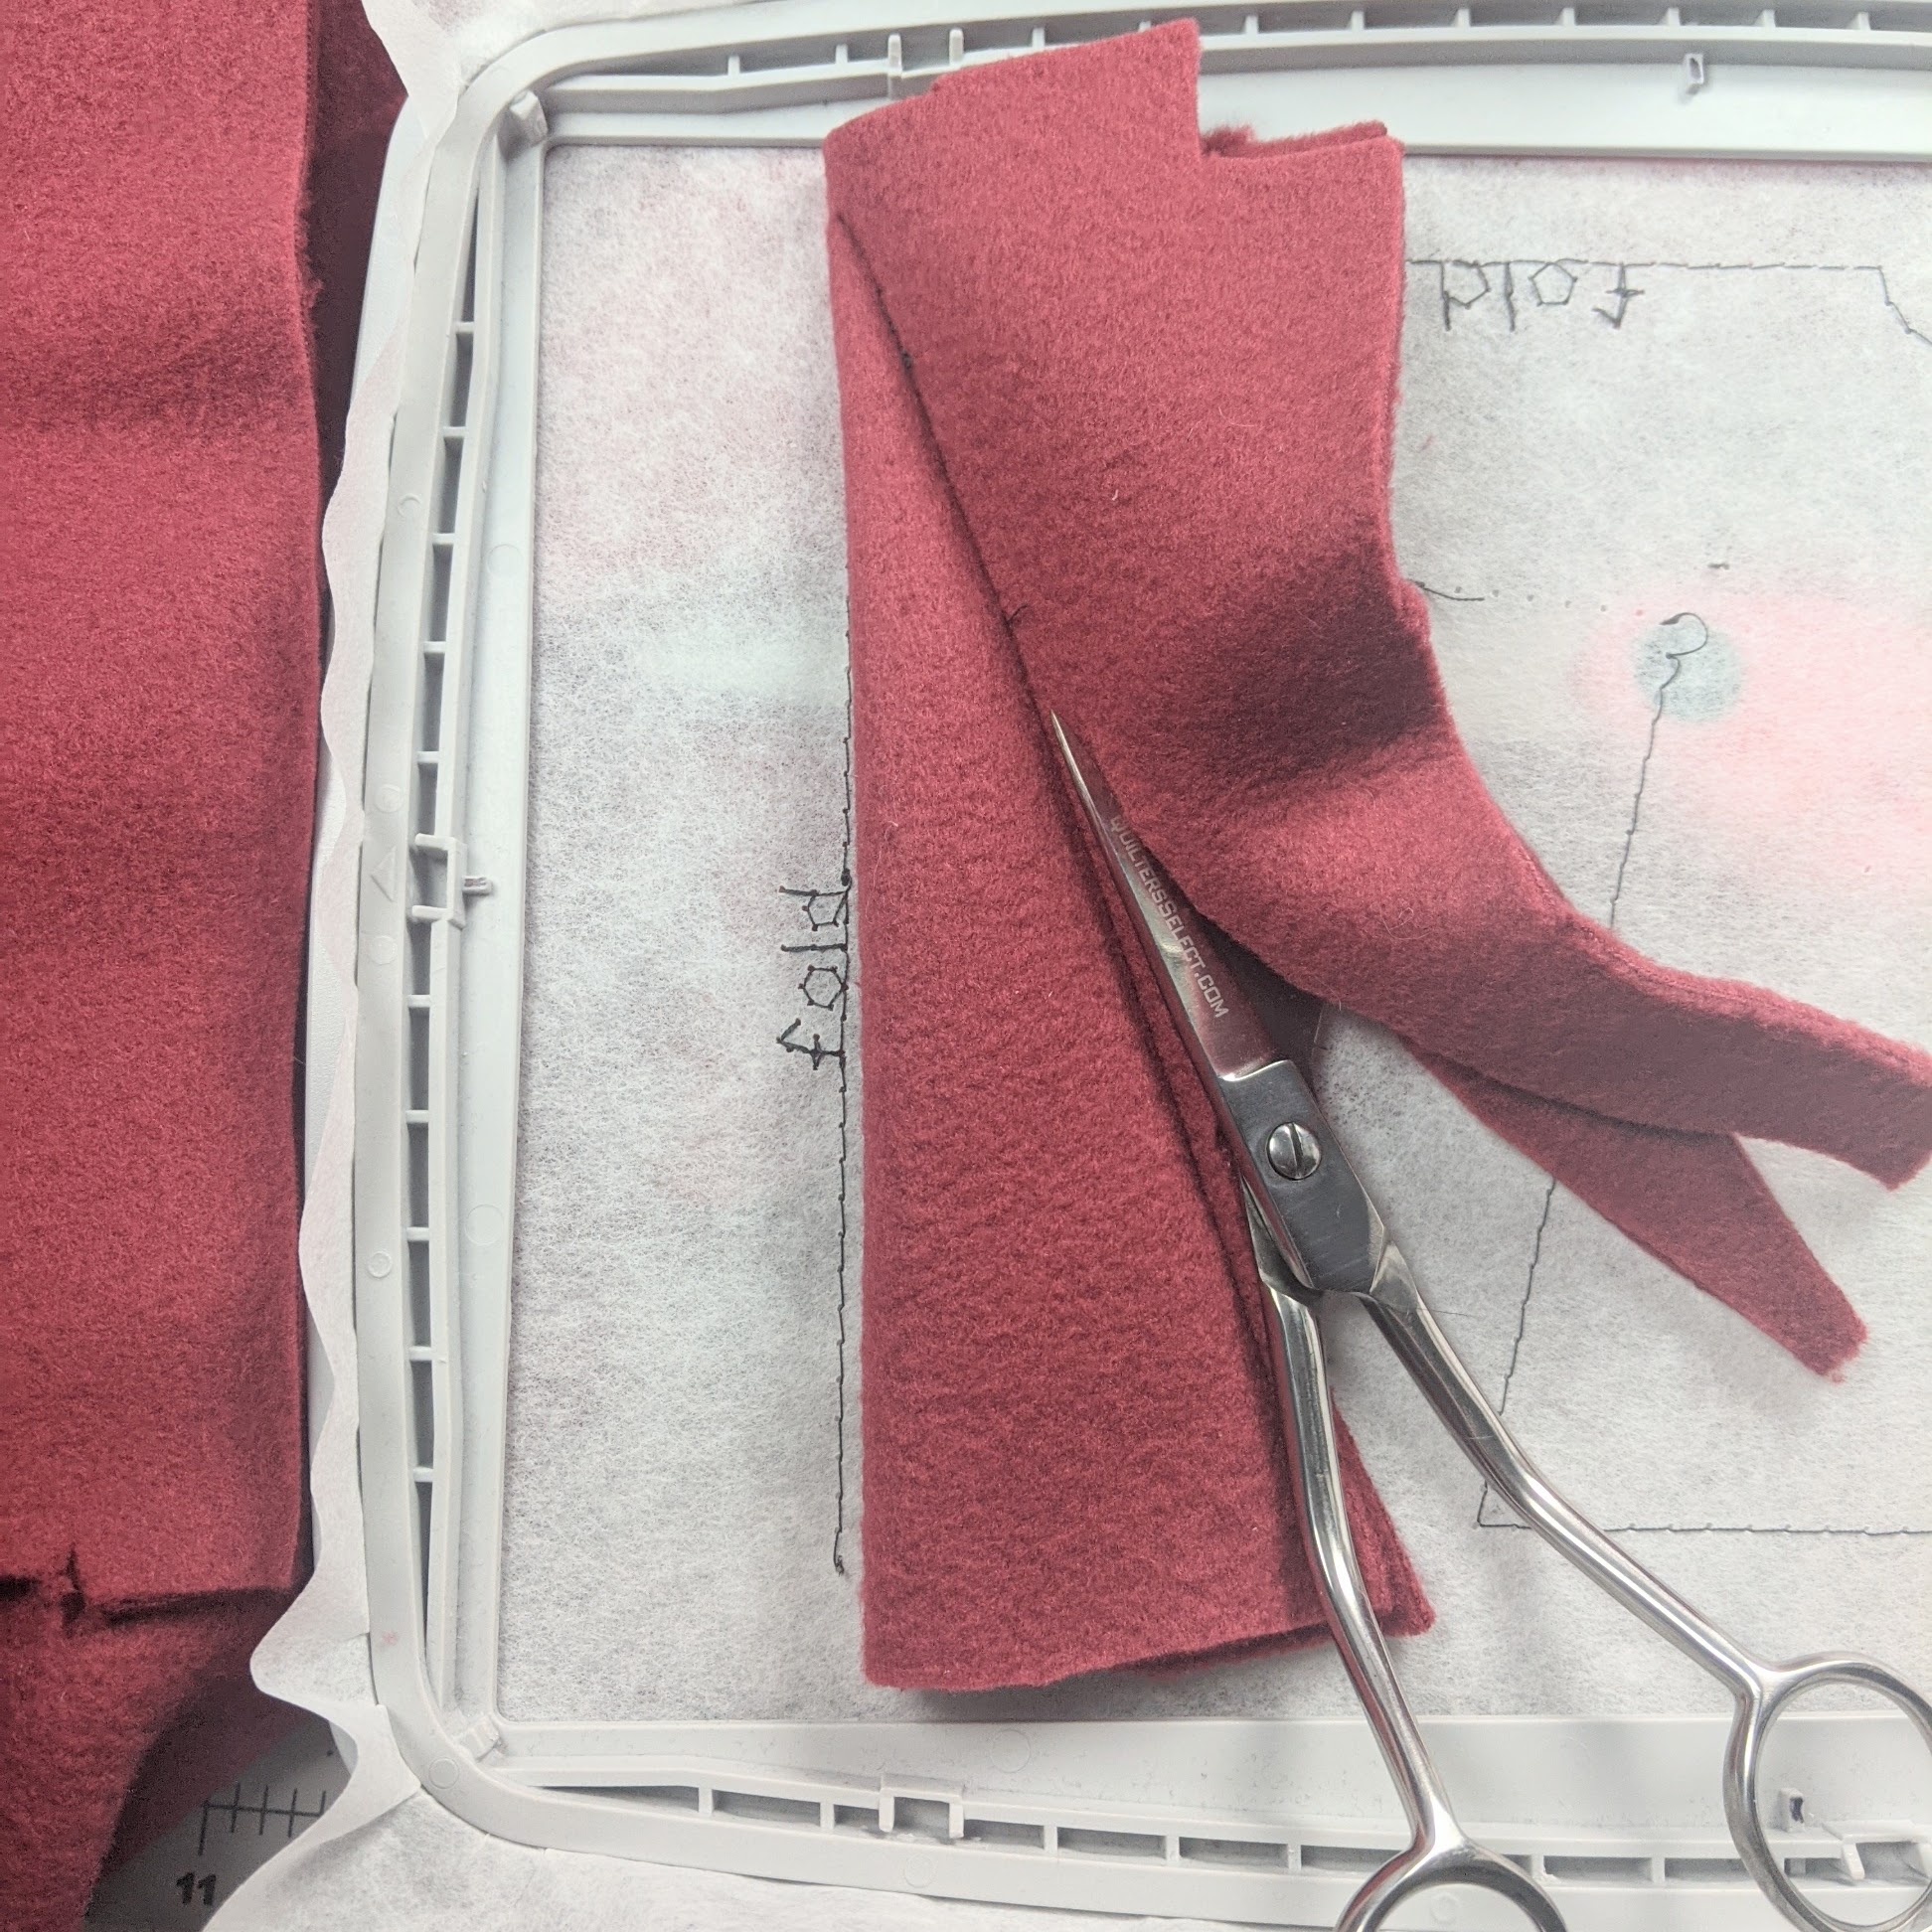
5. Cut the excess fabric away from the hat seam so it’s not covering an area of the coat placement outlines. (don’t cut the side with the fold – cut away the side closest to the coat.)
6. Place another folded piece of non-fray fabric to cover the coat outline, with the fold on the line marked “fold.”
7. STITCH COLOR 3 which will make the seams for the coat.
8. Gently tear project from the stabilizer, clipping any excess threads that remain.
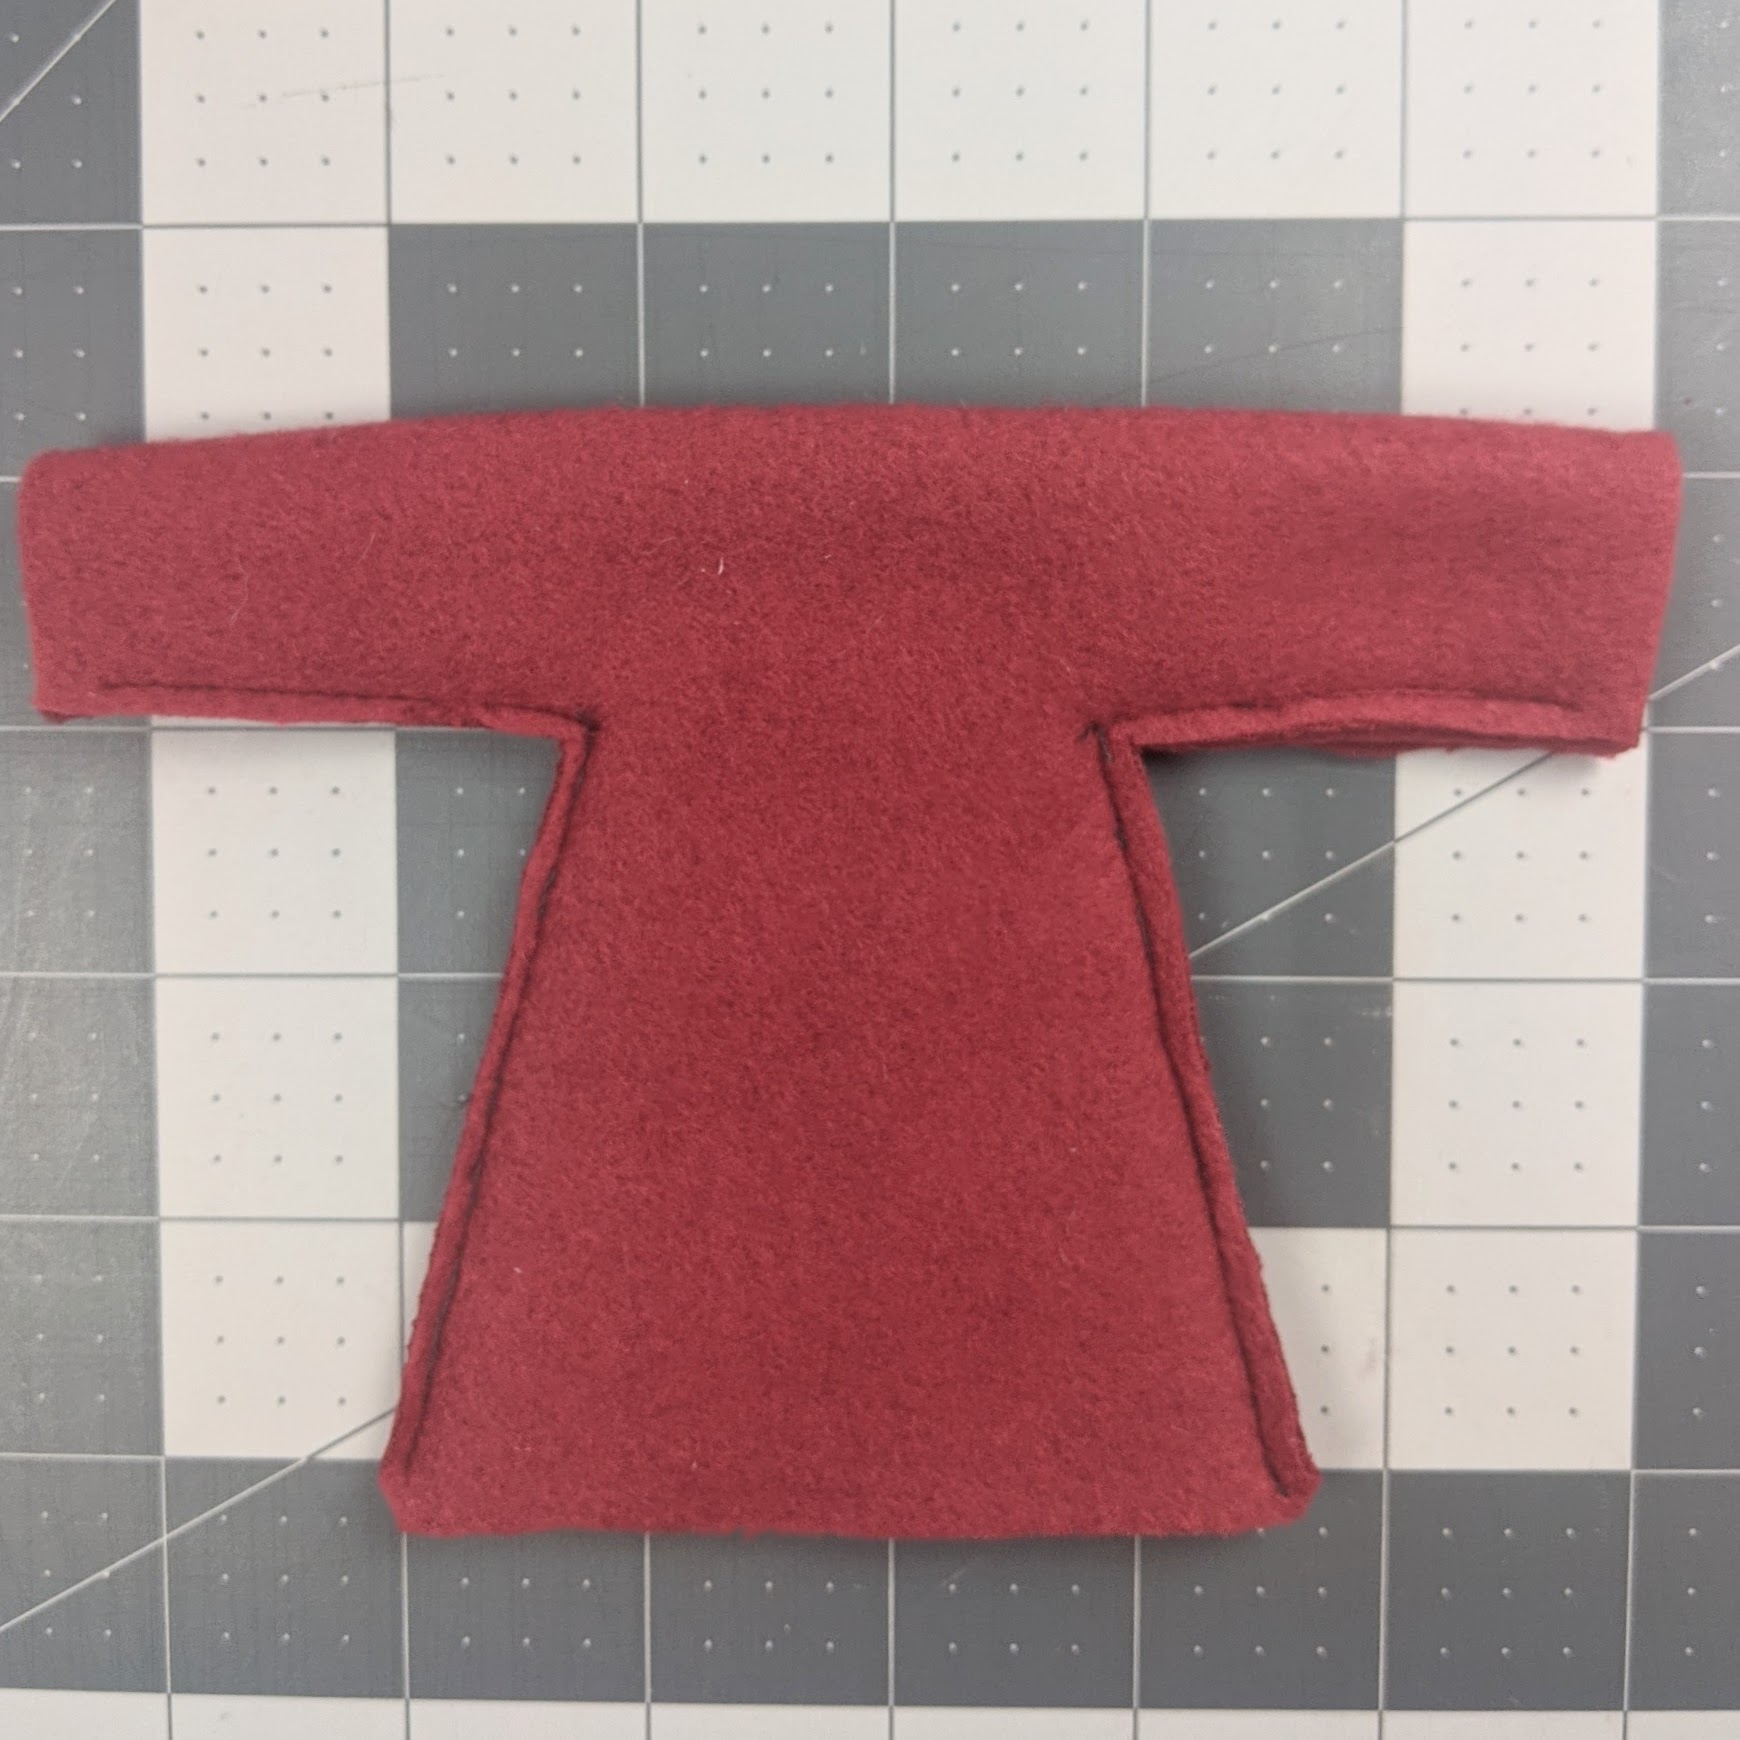
9. Cut away the excess fabric from seam allowances from hat and coat. Do not cut open the fold on either piece. As long as you’ve used non-fray fabrics, you can cut very close to the seams as long as you don’t cut the seams themselves.
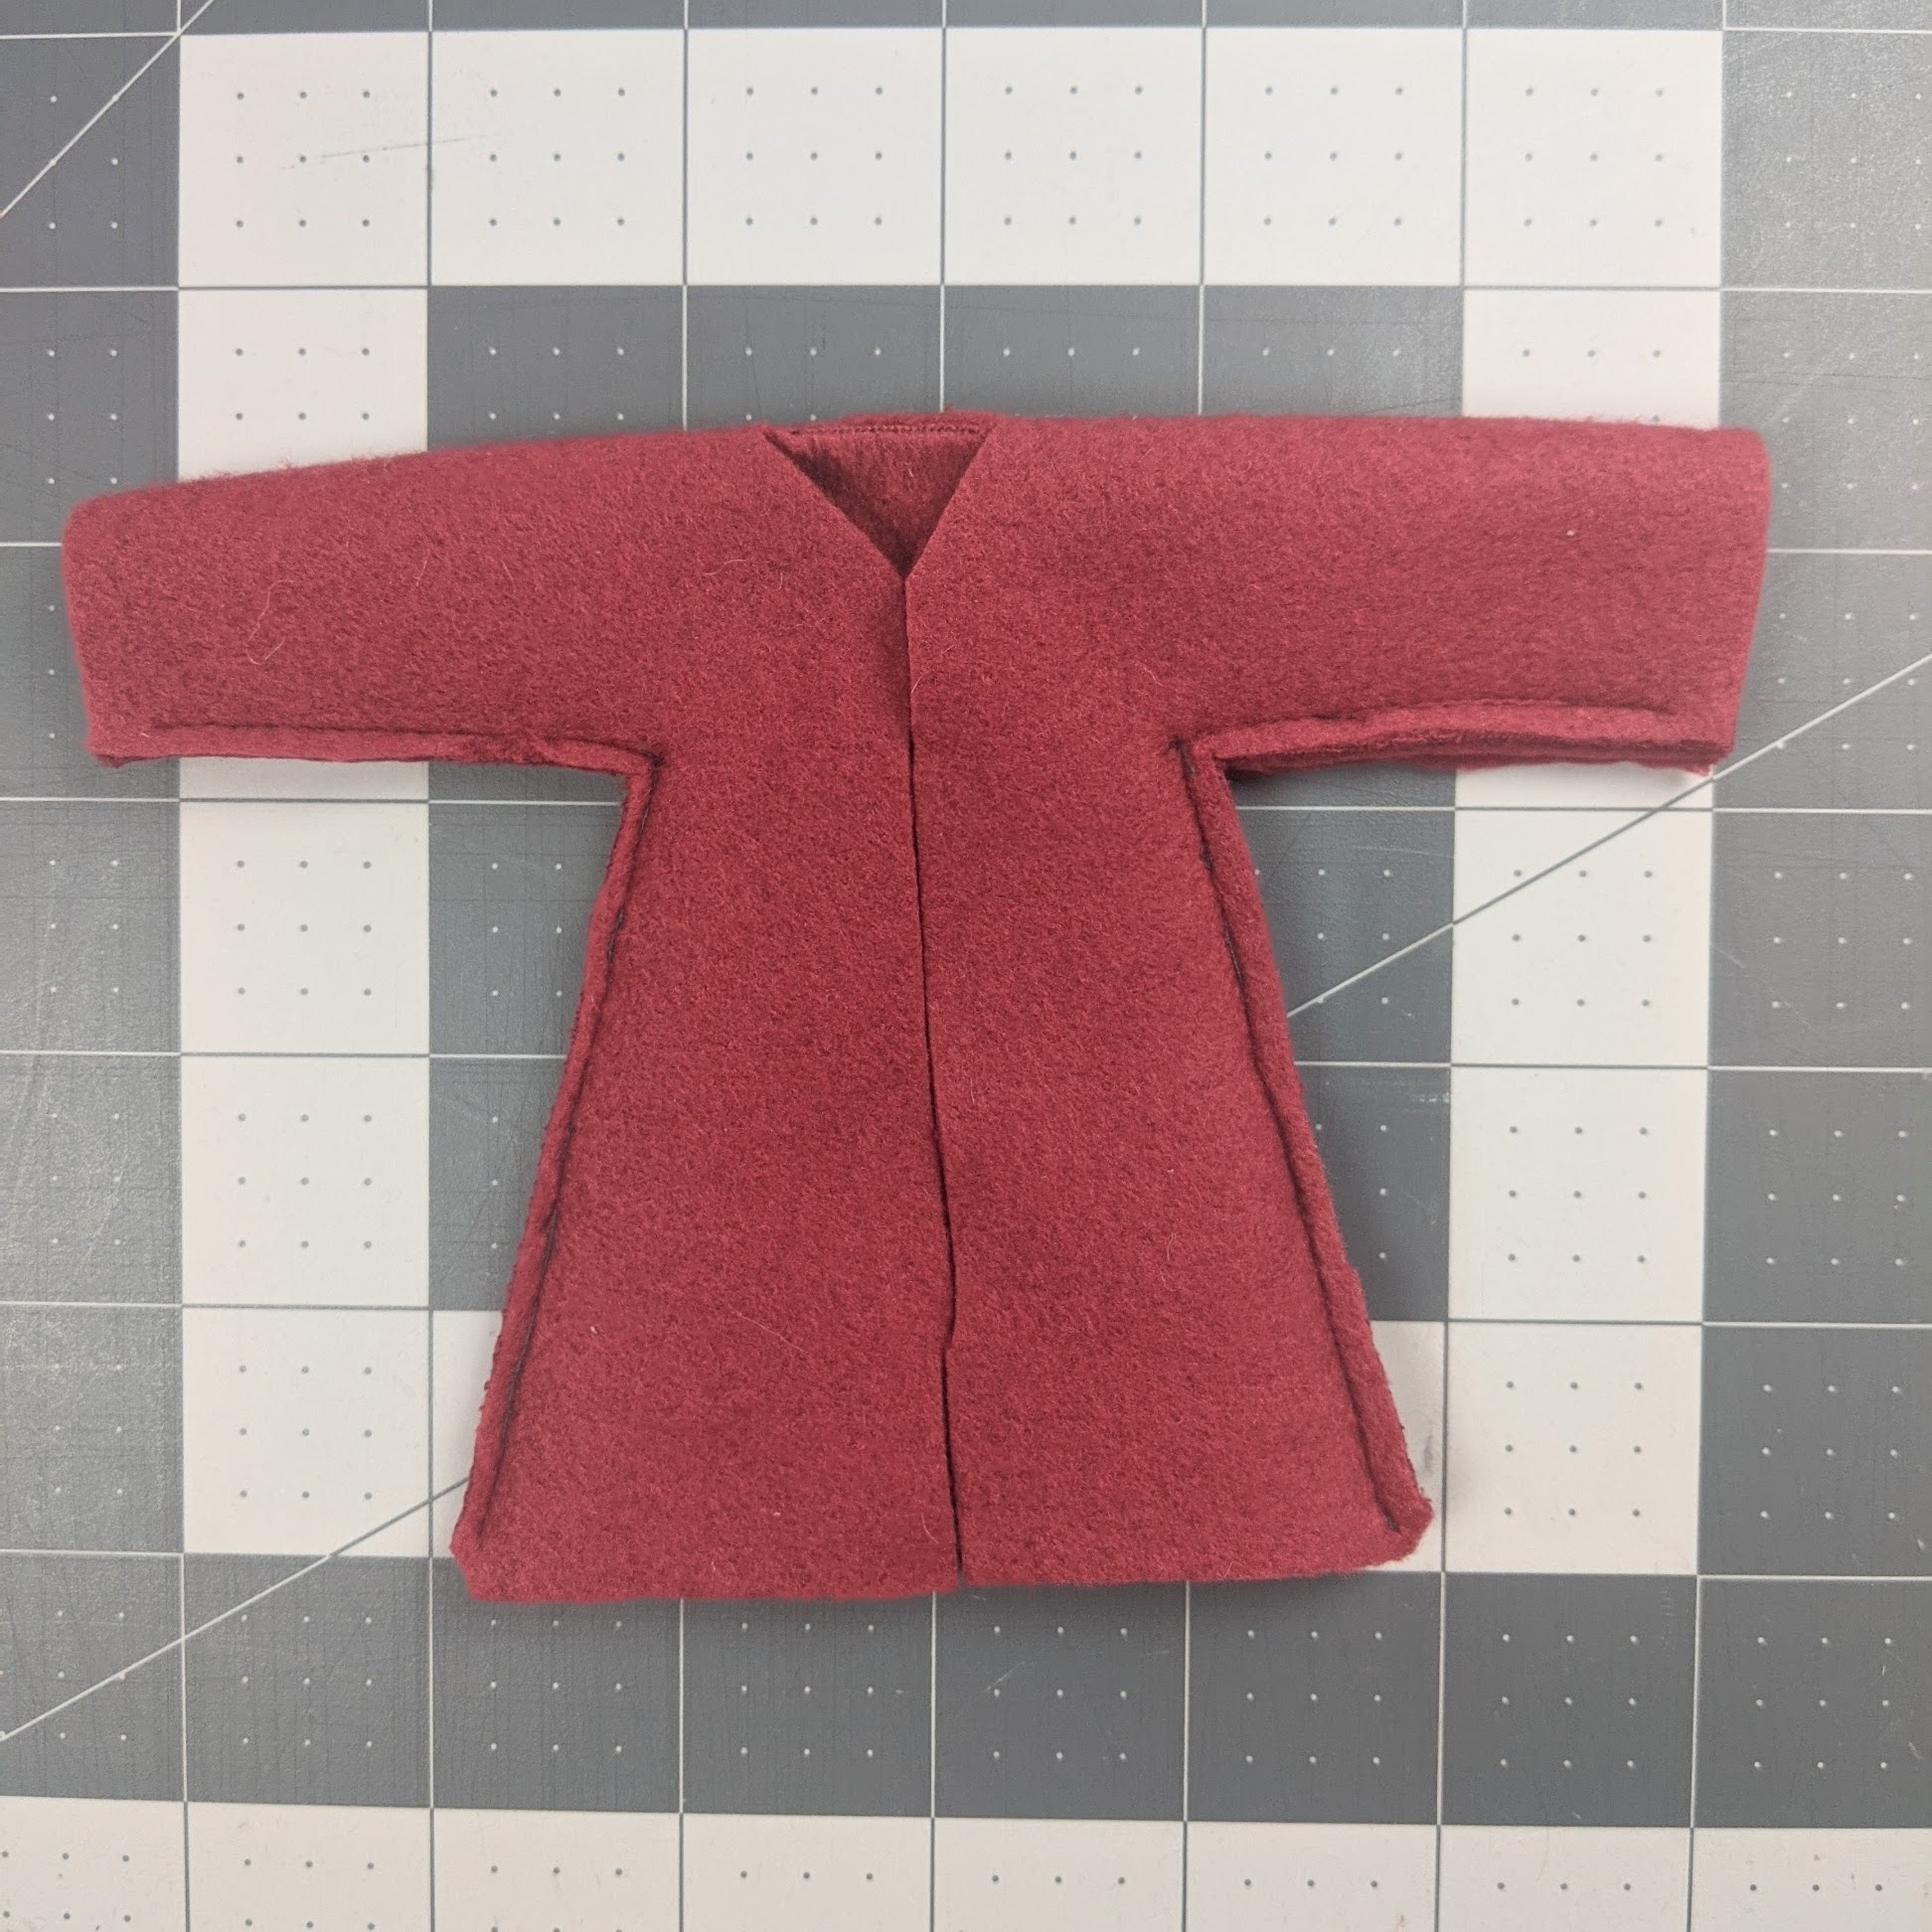
10.Use sharp scissors to cut open the front center of the coat then cut out a half-circle or V-neck for the neckline in front. (The front and back are the same – so you choose which side is the front.)
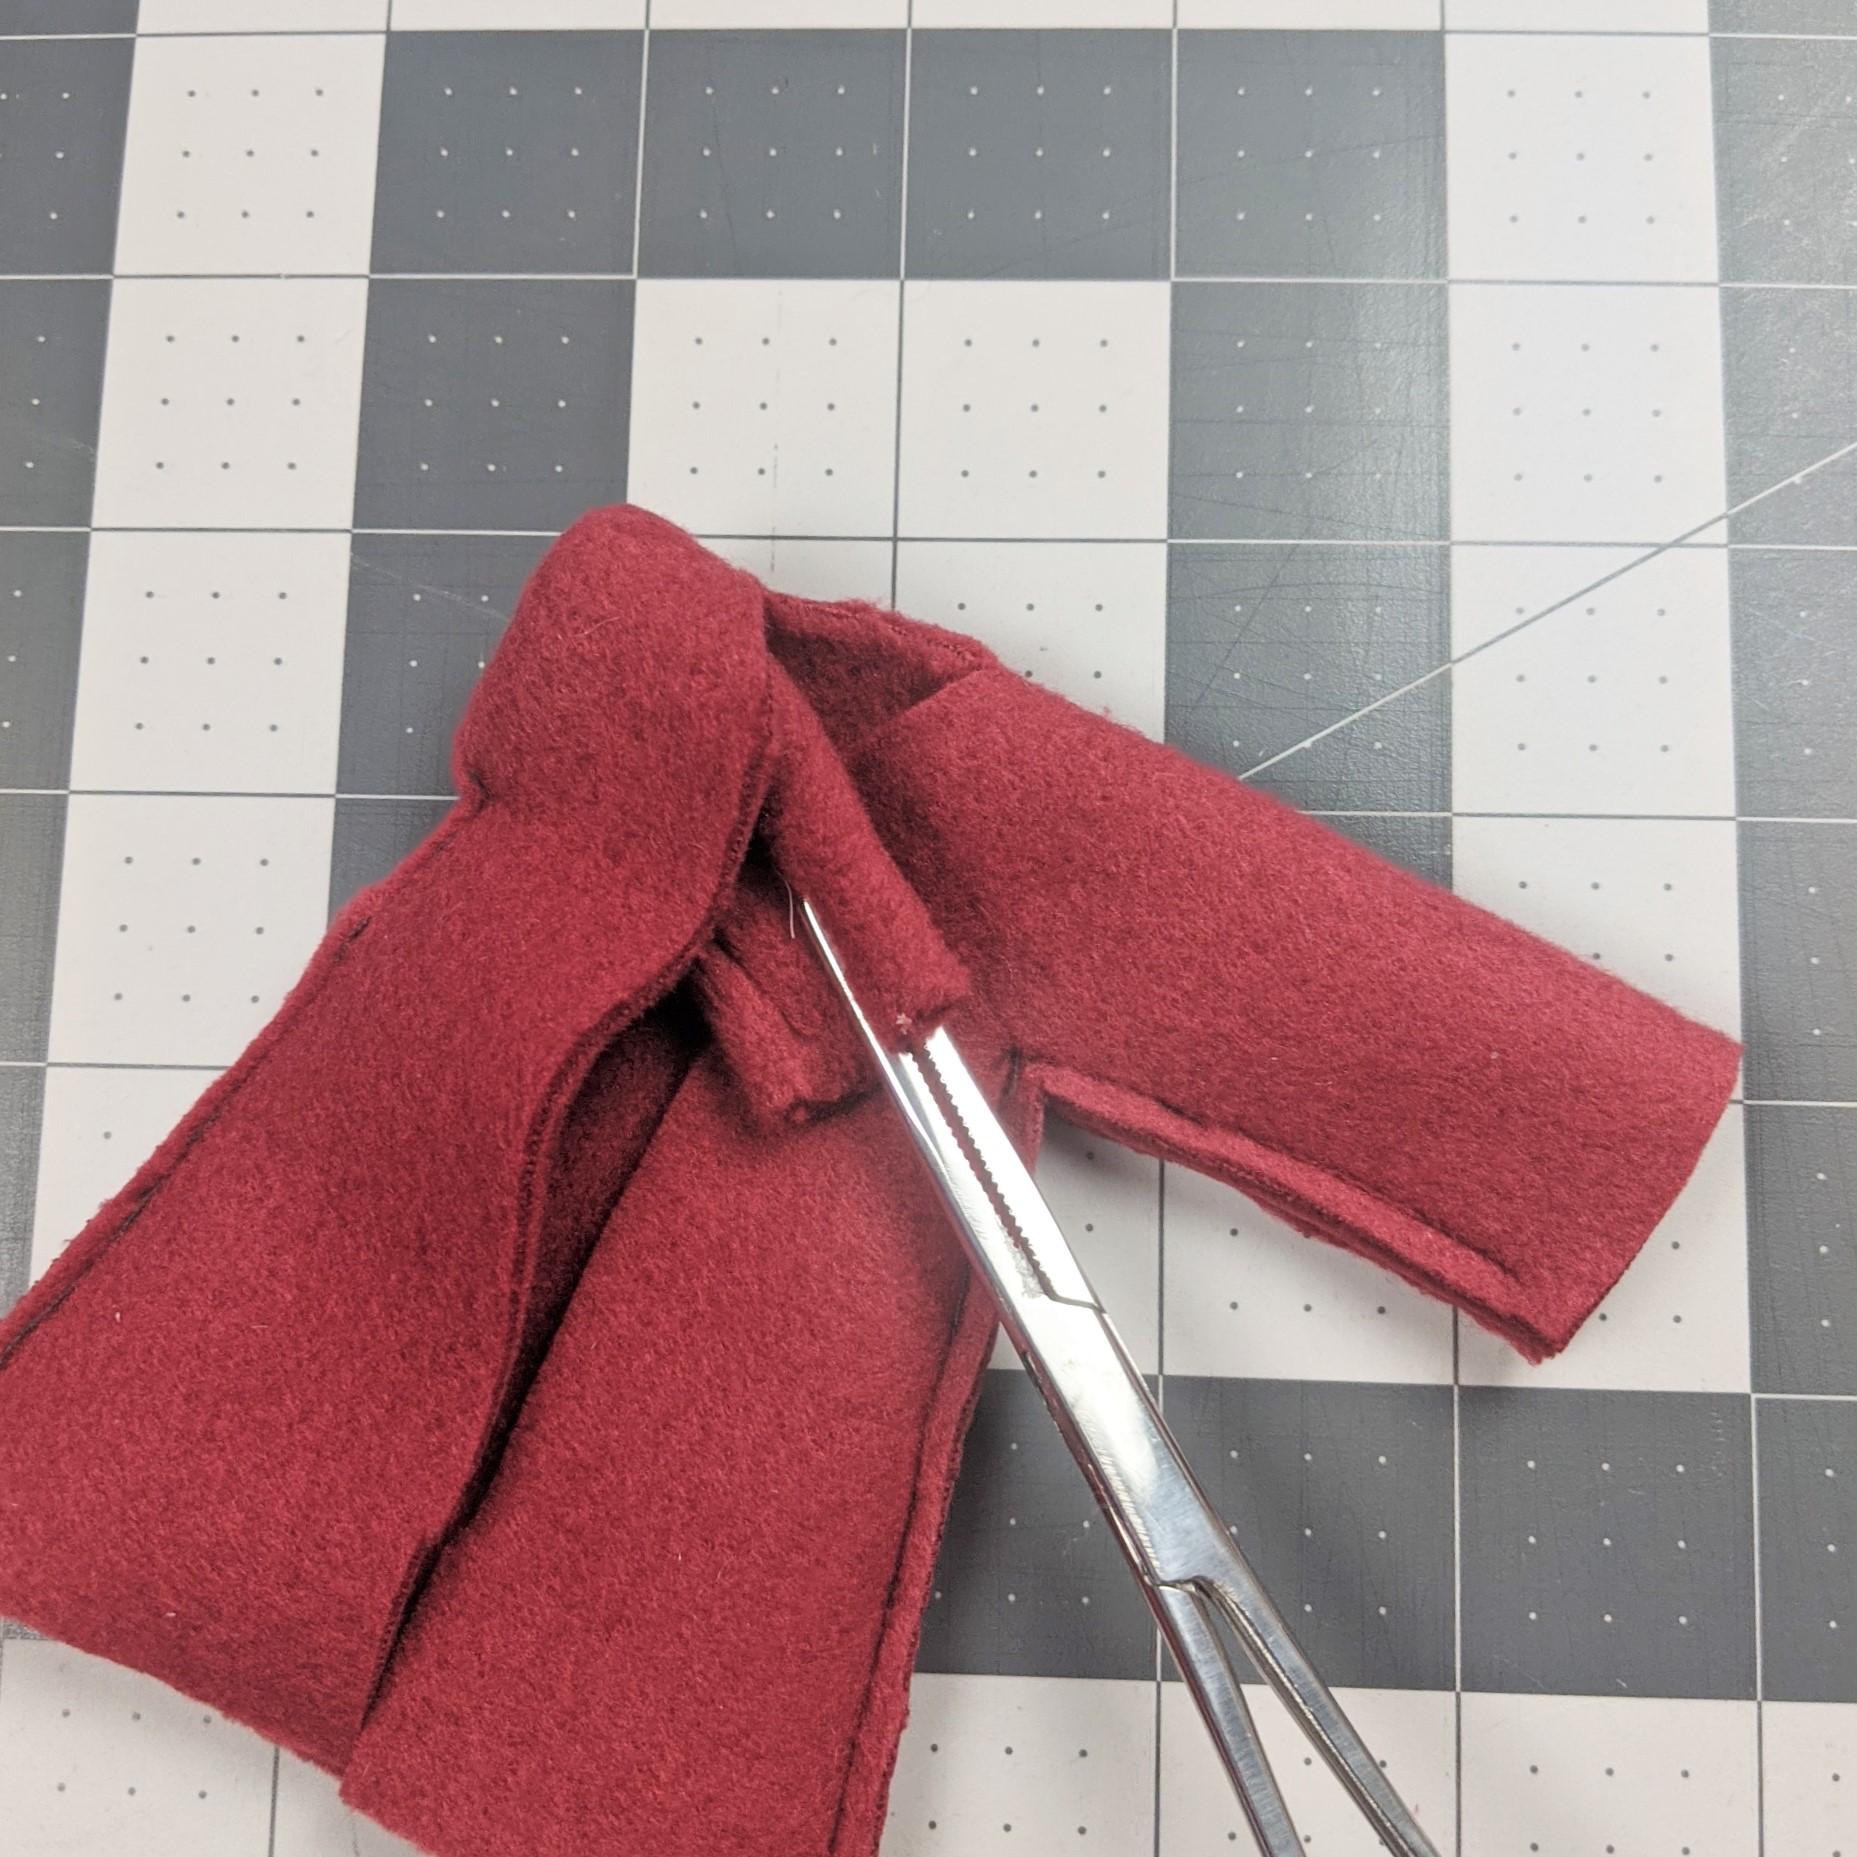
11. Turn the coat and hat inside-out (hemostats will make this easier.)
12.Add trim or embellish however you wish.
INSTRUCTIONS for Coat in 4×4 Hoop:
1. Hoop tear-away stabilizer in your machine embroidery hoop
2. STITCH COLOR 1 onto the stabilizer. This will make a placement outline showing you where to place your fabrics
3. Fold a 4″ x 8″ piece of non-fray fabric in half to 4″x4″ and place over the coat outline with the fold on the labeled fold line. If your fabric is stretchy, there is an arrow showing the desired direction of stretch but it’s not very important unless you’re going to dress a doll in this coat.
4. STITCH COLOR 2 to stitch the seams under sleeves and sides.
5. Gently tear project from the stabilizer, clipping any excess threads that remain.
6. Cut away the excess fabric from seam allowances on sides, bottom hem and cuffs. Do NOT cut the fold – it will be your shoulder “seam.”
7. Use sharp scissors to cut open the front center of the coat, then cut out a half-circle or V-neck for the neckline in front.
8. Turn the coat inside-out (hemostats will make this easy.)
9. Add trim or embellish the coat however you wish.
INSTRUCTIONS for hat in 4×4 hoop:
1. Hoop tear-away stabilizer in your machine embroidery hoop
2. STITCH COLOR 1 onto the stabilizer. This will make a placement outlines showing you where to place your fabrics for 2 separate hats.
3. Fold a 4″ x 4″ piece of non-fray fabric in half and place over the hat outline on the left (where the needle is currently positioned) with the fold on the fold line. Make sure both layers of your fabric cover the hat triangle placement outlines you stitched on the stabilizer.
4. STITCH COLOR 2 to stitch the hat seam
5. If you would like to make a 2nd hat, place another folded square over the LEFT hat placement and stitch COLOR 3. (This is optional but available if you’re making lots of tiny hats)
6. Gently tear project from stabilizer, clipping any excess threads that remain.
7. Cut away the excess fabric from seam allowance, and trim extra fabric from hat tip and brim. Do NOT cut open the fold.
8. Turn the hat inside-out (hemostats will make this easier.)
9. Add trim or embellish the hat however you wish.
Design Specs
Your digital download will be a ZIP file that includes:
- PDF instructions, PDF Templates & Terms (the TnT file)
- Purchased designs in the following 9 machine formats: DST, EXP, HUS, JEF, PES, SHV, VIP, VP3, XXX
The graphic linked below shows design measurements, stitch counts, number of threads, and more.