If you love my art doll designs but don’t have an embroidery machine… You can sew them too!
Here’s a FREE PDF sewing pattern so you can create the body and head to make a multitude of cloth characters to pose.

Join my mailing list for this free pattern
You can get this PDF Sewing Pattern for free when you sign up for email notifications from Ballyhoo Creations. No spam, just useful information for dollmakers like you. (●’◡’●)
How to make these dolls
The videos (below) go into more detail, but the simple instructions are:
These dolls work best with stretch fabrics but feel free to experiment. You may use interfacing on both sides of stretch fabric if you wish. But leaving the back side without an interfacing/stabilizer can allow for more body shaping. It’s up to you.
- Trace the seam lines onto stabilizer or interfacing. You can omit ears or thumbs if you’re worried about sewing those tiny, fussy areas.
- Layer your fabrics with RIGHT sides together, and lay the tracing over them.
- Stitch the seam lines. Use a small stitch length of around 2mm for best results. You can add an opening on the side if you prefer or use the method in step 6 below.
- After stitching, cut away the excess fabric from the seams. Leave a 1/4″ seam allowance on woven fabrics, but a scant 1/8″ seam allowance on stretch knits or fleece since they don’t unravel. (this pattern was designed for stretch fabrics)
- Turn the head right side out using the neck opening.
- Cut a slit in the back of the torso – either horizontal or vertical – and use blunt hemostats to turn the doll right side out. These small parts require a turning tool such as hemostats or turning tubes. Using the right tool for the job will help avoid frustrations with turning. ( ఠ ͟ʖ ఠ)
- (optional) Add a wire armature to make the doll pose, stand on its own, or turn it into a stop-motion puppet.
- Stuff the doll’s body and head to your liking.
- Create a face on the doll’s head before attaching the head to the body. It’s easier to manipulate just the head rather than the head jointed to the body.
- Close the body by using a ladder stitch.
- Tuck the head’s neck fabric inside the head. Use a needle and thread to make a running stitch to gather the head opening. Insert the body neck stem into the head opening and pull the threads to tighten and tie a knot. You may also hand-stitch the head onto the neck stem or use a button joint to keep the head mobile.
- Embellish with hair, add clothes or other trims.

To learn more about turning, stuffing, wire armatures, or hand stitches, watch my free dollmaker video series.
Free Video Series
Learn the skills for making dolls, plushies, and puppets in my free video series.

Watch a Video of Similar art doll construction
Even though the video below uses an embroidery machine for the stitching, you can skip that part and watch the assembly process. It’s exactly the same whether the seams were done with a sewing machine or embroidery machine.
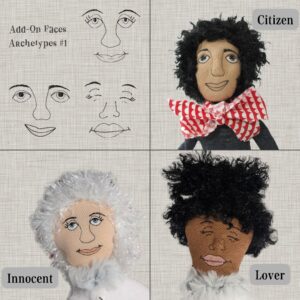
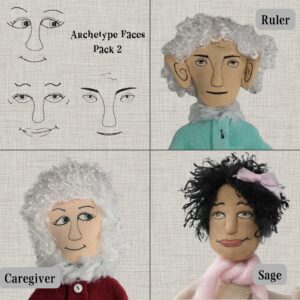
Combine with Machine Embroidery Heads/Faces
You can sew the body with your sewing machine using this free sewing pattern, then sew the heads using ANY embroidery machine since the heads only require a 4×4″ hoop. That way you can get any of my machine embroidery face designs and create poseable art dolls with them. All of the doll heads in my art doll design collection will fit this body. The machine embroidery designs include 3 sizes, and I like to use the medium size heads on this pattern, but you can play around with sizing.


DIY Head Designs
You can also draw, paint or stitch a face onto your doll head. Eyes can be made with buttons, beads or plastic doll eyes. There are SO many options! The design of the neck stem also allows you to attach a different type of head, such as one made of polymer clay or a needle-felted head. You can even create soft-sculpture heads with needle sculpting like this doll below.
Play and have FUN!
This free pattern can be assembled and embellished in so many ways. Play around and experiment with techniques that resonate with you. Paint the face if you’re a painter. Embroider the details if you’re into that. Overstuff the stretchy fabrics to make them curvy. Be creative and make something you love. You’re never too old to play with dolls and that includes making them.
Licensing Note for this Pattern
You can make and even sell small quantities of handmade dolls you create with this pattern. But you are NOT allowed to copy, sell, or distribute the pattern in any way since that violates copyright law (and yes, even free patterns are protected by copyright.) If you want to share the pattern with friends, please send them to this page and help them discover all the quirky goodness here at Ballyhoo Creations for themselves!